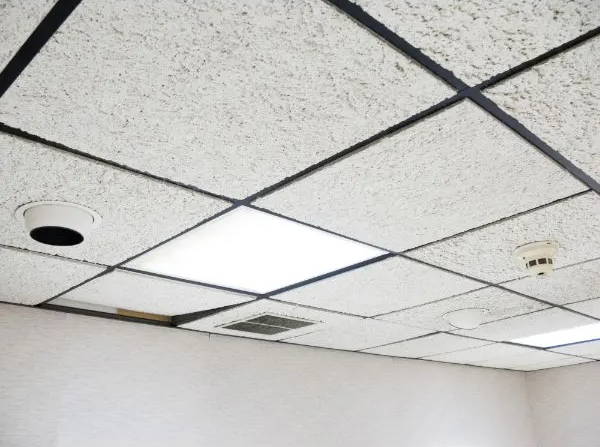
Soundproofing a drop ceiling can effectively reduce noise from above. It involves adding materials to block sound.
Are you tired of hearing every footstep from the floor above? Do you wish to enjoy a quieter space? Soundproofing a drop ceiling can be your solution. It helps in creating a peaceful environment, whether it’s for an office, a bedroom, or a recording studio.
By addressing the noise problem, you can focus better, sleep well, or work without distractions. This guide will walk you through the steps and materials needed to soundproof your drop ceiling. Let’s dive in and make your space quieter and more comfortable.
Credit: www.soundproofcow.com
Introduction To Soundproofing
Soundproofing is the process of reducing or eliminating sound transmission from one area to another. This is particularly important in environments like homes, offices, and studios. Soundproofing a drop ceiling can help create a quieter and more comfortable space.
Importance Of Soundproofing
Soundproofing is crucial for several reasons:
- Noise Reduction: Minimizes external noises that can disrupt your activities.
- Privacy: Ensures conversations and sounds do not travel between rooms.
- Improved Acoustics: Enhances the quality of sound within a room.
Common Sound Issues
Common sound issues in buildings with drop ceilings include:
- Footsteps: Noise from people walking above.
- Voices: Conversations from adjacent rooms.
- Mechanical Noise: Sounds from HVAC systems or plumbing.
| Sound Issue | Source | Impact |
|---|---|---|
| Footsteps | People walking above | Disturbance, distraction |
| Voices | Conversations in adjacent rooms | Lack of privacy |
| Mechanical Noise | HVAC systems, plumbing | Background noise, distraction |
Addressing these issues can significantly improve the comfort and functionality of your space.
Materials And Tools Needed
Soundproofing a drop ceiling can greatly reduce noise. To achieve this, you need specific materials and tools. Below, we outline the essentials for the task.
Essential Materials
- Acoustic panels: These absorb sound and reduce noise.
- Mass-loaded vinyl (MLV): A dense material that blocks sound.
- Fiberglass insulation: Helps to absorb and dampen sound.
- Green glue: A soundproofing compound that seals gaps.
- Ceiling tiles: Choose acoustic tiles for better sound absorption.
Recommended Tools
- Utility knife: For cutting materials to size.
- Measuring tape: Ensures accurate measurements.
- Screwdriver: To secure panels and tiles.
- Caulk gun: For applying green glue.
- Staple gun: To fix insulation in place.
Assessing Your Drop Ceiling
Assessing your drop ceiling is the first step to soundproofing. This process involves identifying problem areas and measuring the ceiling space. Doing this ensures you address the right spots and use the correct materials. Let’s dive into the details.
Identifying Problem Areas
To start, locate the areas where sound escapes or enters. Common spots include gaps between ceiling tiles and the walls. Inspect the edges and corners of your drop ceiling. Look for any visible cracks or openings. Make a note of these problem areas.
- Check for gaps between tiles.
- Inspect the edges and corners.
- Look for cracks or openings.
Next, listen carefully. Stand in different parts of the room and note where the sound is louder. This can help you identify where the sound is coming from.
Measuring Ceiling Space
Once you’ve identified the problem areas, it’s time to measure the ceiling space. Accurate measurements are crucial for buying the right amount of soundproofing materials.
Use a measuring tape to measure the length and width of the ceiling. Write down these measurements. Calculate the total area by multiplying the length by the width.
| Measurement | Value |
|---|---|
| Length | [Insert Length] |
| Width | [Insert Width] |
| Total Area | [Insert Total Area] |
Measuring the ceiling space ensures you buy enough materials without wasting money. It also helps you plan the layout of the soundproofing materials.
You can now move on to selecting the appropriate soundproofing materials for your drop ceiling.

Credit: www.youtube.com
Preparing The Workspace
Before you start soundproofing your drop ceiling, it’s crucial to prepare your workspace. Proper preparation ensures a smooth and safe process. Taking time to set up your work area right can make a huge difference. Let’s explore how to do this with two essential steps: clearing the area and following safety precautions.
Clearing The Area
First, remove all furniture and items from the room. This creates space to work and prevents damage to your belongings. Store fragile items in a safe place. If moving large furniture is difficult, cover it with a drop cloth or plastic sheet. This helps protect it from dust and debris.
Next, inspect the ceiling for any existing fixtures. Remove light fixtures, ceiling fans, or other attachments. Make sure to turn off the power before removing electrical items. This step ensures you have full access to the ceiling grid.
Safety Precautions
Safety is key when working on a ceiling. Wear safety goggles to protect your eyes from dust and debris. Use gloves to protect your hands from sharp edges and rough materials. A dust mask is also necessary to avoid inhaling harmful particles.
Ensure the ladder or scaffolding you use is stable and secure. Check that it is on a flat surface and can support your weight. Do not climb a ladder without someone nearby. Having a helper can provide extra safety and assistance.
Finally, keep your workspace well-lit. Good lighting helps you see clearly and avoid accidents. Use portable lights if the room’s lighting is not sufficient. Proper lighting ensures you can work safely and effectively.
Installing Acoustic Panels
Soundproofing a drop ceiling can greatly reduce noise. Installing acoustic panels is a key step in this process. These panels absorb sound, preventing it from bouncing around the room. This makes your space quieter and more comfortable.
Choosing The Right Panels
Choosing the right acoustic panels is crucial. Different panels have varying levels of sound absorption. Here are a few things to consider:
- Material: Look for panels made of fiberglass or foam. They absorb sound well.
- Thickness: Thicker panels usually absorb more sound. Choose panels at least 2 inches thick.
- Size: Ensure the panels fit your ceiling grid. Standard sizes are 2×2 feet or 2×4 feet.
- Fire Rating: Check if the panels are fire-resistant. Safety first!
Step-by-step Installation
Installing acoustic panels is not difficult. Follow these steps:
- Measure Your Ceiling: Measure the total area of your ceiling. This helps you know how many panels you need.
- Prepare the Panels: If needed, cut the panels to fit your ceiling grid.
- Remove Old Tiles: Take out the existing ceiling tiles from the grid.
- Install the Panels: Place the acoustic panels into the grid. Ensure they fit snugly.
- Secure the Panels: Use clips or adhesive to keep the panels in place.
- Check for Gaps: Ensure there are no gaps between panels. Gaps can let sound through.
Following these steps ensures a proper installation. Your room will be quieter and more pleasant. Soundproofing a drop ceiling with acoustic panels is an effective way to reduce noise.
Credit: www.soundproofingcompany.com
Adding Mass To The Ceiling
Adding mass to your drop ceiling is an effective way to reduce noise transmission. The added weight helps block sound waves, making the space quieter. This section will cover two methods: Using Mass Loaded Vinyl and Applying Green Glue.
Using Mass Loaded Vinyl
Mass Loaded Vinyl (MLV) is a dense, flexible material. It is designed to add mass to structures and block sound. MLV is easy to install and works well for drop ceilings.
Here’s how you can use MLV for your drop ceiling:
- Measure the ceiling area to determine how much MLV you need.
- Cut the MLV sheets to fit the ceiling tiles.
- Remove the ceiling tiles and attach the MLV sheets using construction adhesive.
- Replace the tiles back into the ceiling grid.
Using MLV adds significant mass to the ceiling, effectively reducing noise.
Applying Green Glue
Green Glue is a soundproofing compound used between layers of building materials. It converts sound energy into small amounts of heat. This makes it a great option for soundproofing.
Follow these steps to apply Green Glue to your drop ceiling:
- Remove a ceiling tile and place it on a flat surface.
- Apply Green Glue in a random pattern on the back of the tile.
- Sandwich the Green Glue with another layer, such as drywall or another tile.
- Place the modified tile back into the ceiling grid.
Green Glue is easy to apply and effective at reducing sound transmission. It works well for both new constructions and existing ceilings.
Both MLV and Green Glue are excellent choices for adding mass to a drop ceiling. They help create a quieter, more peaceful environment.
Sealing Gaps And Cracks
Sealing gaps and cracks is a crucial step in soundproofing a drop ceiling. Unsealed gaps can let sound easily pass through. This can defeat the purpose of your soundproofing efforts. By sealing these gaps, you can significantly reduce noise leakage.
Identifying Gaps
First, you need to find the gaps in your drop ceiling. Use a flashlight to spot any cracks or openings. Common areas include where the ceiling meets the walls and around light fixtures. Mark these spots for easy reference.
Using Acoustic Sealant
Once you’ve identified the gaps, it’s time to seal them. Use an acoustic sealant for the best results. Acoustic sealants are designed to block sound. They remain flexible and won’t crack over time. Apply the sealant to the gaps you marked. Use a caulking gun for precise application.
Smooth the sealant with a putty knife. This ensures it fills the gaps completely. Allow the sealant to dry as per the manufacturer’s instructions. Check for any missed spots and reapply if needed.
Final Adjustments
Once you have completed the initial steps of soundproofing your drop ceiling, it’s important to make some final adjustments. This will ensure the best possible results. These adjustments involve testing your soundproofing and making necessary tweaks. Below are the steps you should follow.
Testing Soundproofing
It’s time to test how effective your soundproofing is. Start by playing some loud music or using a noise generator in the room above. Then, go to the room below and listen for any sounds.
Pay close attention to the level of noise. Make note of any areas where sound leaks through. Use a decibel meter if you have one. This will help you measure the noise levels accurately.
Here’s a simple table to help you keep track:
| Location | Noise Level (dB) | Notes |
|---|---|---|
| Room Center | 50 dB | Moderate noise |
| Room Corners | 45 dB | Lower noise |
| Near Windows | 60 dB | High noise |
Making Necessary Tweaks
Based on your test results, you’ll need to make some adjustments. Here are some steps to follow:
- Identify Weak Spots: Focus on areas where sound is leaking through.
- Add More Insulation: Insert additional insulation in areas with high noise levels.
- Seal Gaps: Use acoustic sealant to close any gaps or cracks.
- Install Acoustic Panels: Place acoustic panels on the ceiling tiles in noisy areas.
These tweaks will help improve the overall soundproofing. Don’t rush this process. Take your time to ensure each step is done correctly.
Remember, effective soundproofing is a process. Each adjustment brings you closer to a quieter space.
Maintenance Tips
Maintaining a soundproof drop ceiling is crucial for long-term effectiveness. Regular upkeep ensures the ceiling continues to block unwanted noise. Follow these tips to keep your soundproof ceiling in top condition.
Regular Inspections
Regular inspections help identify issues early. Check the ceiling tiles and panels every few months.
- Look for cracks or gaps between tiles.
- Ensure all tiles are securely in place.
- Check for any signs of water damage or mold.
Use a flashlight to inspect hard-to-see areas. Proper lighting helps you spot issues easily. Addressing problems early prevents larger issues later.
Handling Repairs
Repairing a soundproof drop ceiling involves simple steps. Follow these guidelines for effective repairs.
- Replace damaged tiles immediately. Use similar materials to maintain soundproofing.
- Seal any gaps with acoustic sealant. Ensure the sealant is compatible with your ceiling material.
- Fix loose tiles. Use clips or adhesive to secure them.
For water damage, remove the affected tiles. Let the area dry completely before replacing them. Use mold-resistant tiles to prevent future problems.
Regular maintenance extends the life of your soundproof ceiling. It keeps your space quiet and comfortable. Follow these tips for a well-maintained ceiling.
Frequently Asked Questions
What Materials Are Best For Soundproofing A Drop Ceiling?
Acoustic panels, mass-loaded vinyl, and soundproofing insulation work best for soundproofing drop ceilings. They reduce noise effectively.
How Much Does It Cost To Soundproof A Drop Ceiling?
The cost varies depending on materials and room size. On average, it ranges from $500 to $1,500.
Can I Soundproof A Drop Ceiling Myself?
Yes, you can. With the right materials and tools, it’s a DIY-friendly project. Follow step-by-step guides.
How Effective Is Soundproofing A Drop Ceiling?
Soundproofing a drop ceiling significantly reduces noise. It enhances privacy and comfort, especially in multi-story buildings.
Conclusion
Soundproofing a drop ceiling can improve your home’s comfort. It’s a practical project. Use materials like acoustic tiles and insulation. Seal gaps to prevent sound leakage. Follow these steps to achieve peace and quiet. By doing so, you create a calm environment.
Enjoy the benefits of reduced noise. With effort and the right tools, you can achieve great results. Start your soundproofing journey today. Your ears will thank you.