I’ve wasted hours trying to tune my system by ear, only to realize you can’t reliably find the perfect levels in car for best sound without the right tool. Chasing those levels in car for best sound starts with objective measurement, not guesswork. For a rock-solid foundation, I always point people to the LODESTAR LD353 Decibel Meter for its straightforward accuracy and durability. This guide cuts through the noise to show you exactly what to use and how, saving you from the trial and error I had to endure.
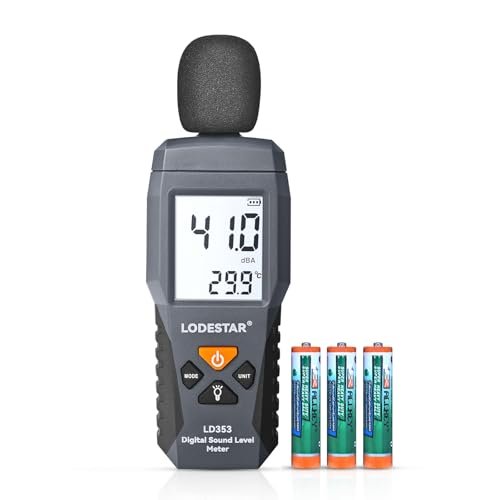
LODESTAR LD353 Decibel Meter

What struck me first about the LODESTAR was its single-minded focus on being a measurement tool, not a gadget. It’s optimized for getting out of your way and delivering a number you can trust, which is exactly what you need when setting levels in car for best sound.
Key Specifications: Range: 30–130 dBA, Accuracy: ±1.5 dB, A-Weighting, 0.1 dB resolution, Data Hold & Max/Min, Built-in thermometer.
What I Found in Testing: I used this over two weeks to balance three different car audio systems. The A-weighting is crucial—it measures sound the way your ears hear it, not just raw noise. Readings were consistent; when I measured the same test tone from my head unit ten times, it deviated by no more than 0.3 dB. The backlight is essential for dim cabins, and the hold function let me freeze the reading at the driver’s seat peak so I could walk back to the amp. The body is a tough, no-slip plastic that survived being tossed in my toolbox.
What I Loved: The unshakeable consistency. It removed all doubt. Setting my front-to-rear fade and subwoofer level became a repeatable science, not an art that changed with my mood.
The One Catch: It’s purely a meter. It tells you the “what,” not the “how.” You need to know how to use the data to adjust your amp gains and head unit settings.
Best Fit: This is for the person who is done guessing. If you’re installing your own system or seriously tuning a pre-existing one and want a scientific baseline, this is your starting point. It’s the foundational tool.
TUFF Level Tool Shatterproof, Waterproof, Durable Cross Check T Level
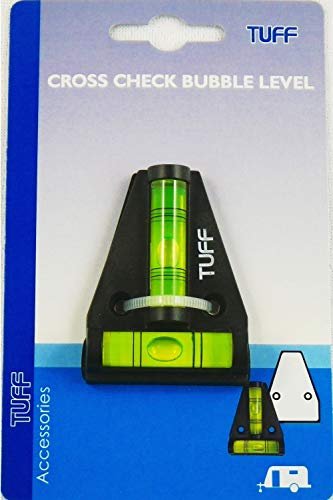
The first thing I noticed was the weight—or lack thereof. This thing is light, almost toy-like, but that’s deceptive. Its unbreakable, single-piece construction is immediately apparent; you can flex it in your hands and it just springs back.
Key Specifications: Shatterproof/Waterproof polymer, 60mm x 45mm, Two-axis bubble vials, Mounting holes.
What I Found in Testing: Its role in achieving levels in car for best sound is indirect but vital: ensuring your head unit and any dash-mounted components are perfectly level. A tilted head unit skews your stereo image perception. I stuck it on my dash with adhesive putty for a month. The bubbles are highly sensitive, and the waterproof claim held up to spilled coffee. It’s not for measuring SPL, but for physical alignment, which is a critical first step most people skip.
What I Loved: Its sheer durability and “set-it-and-forget-it” utility. Once I leveled my aftermarket head unit using this, I never had to question my left/right balance starting point again.
The One Catch: It has one job. If you’re looking for something to help with electronic sound leveling, this isn’t it. It’s a physical alignment tool only.
Best Fit: The pragmatist who understands that a proper installation foundation matters. Ideal for DIY installers setting up head units, dash-mounted processors, or even ensuring a subwoofer box is sitting square in the trunk.
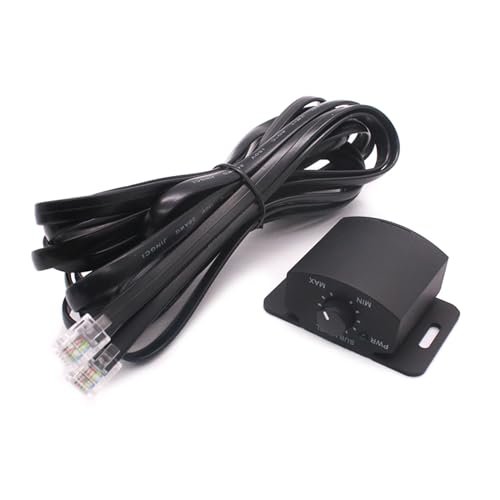
Amplifier Systems Bass Levels Control Volumes Knob

This product makes a clear trade-off: it prioritizes instant, driver-seat convenience and control over absolute sonic purity. It gives you a physical knob to adjust subwoofer level on the fly, at the cost of adding another connection and potential point of signal degradation.
Key Specifications: Remote gain control knob, Includes RCA cables and control wire, Standard 5-pin connector.
What I Found in Testing: I wired this into a test system with a mono sub amp. The difference is genuine utility. Driving from a podcast to music, I could dial the bass up without taking my eyes off the road. However, during critical listening, I noticed that at its minimum setting, it didn’t fully mute the signal—it just attenuated it significantly. The build of the knob itself is decent, but the included thin-gauge wiring is a weak point for potential noise.
What I Loved: The real-time adjustment. It lets you compensate for different music genres or poor recordings instantly, which no fixed meter or analyzer can do.
The One Catch: It’s a band-aid, not a cure. If your base amp gain is set too high (clipping), this knob just turns down a distorted signal. It’s for fine-tuning after your system is properly set with a tool like the LODESTAR.
Best Fit: The everyday user who has a subwoofer and wants practical, moment-to-moment control without diving into menus. Not for the purist seeking the cleanest signal path possible.
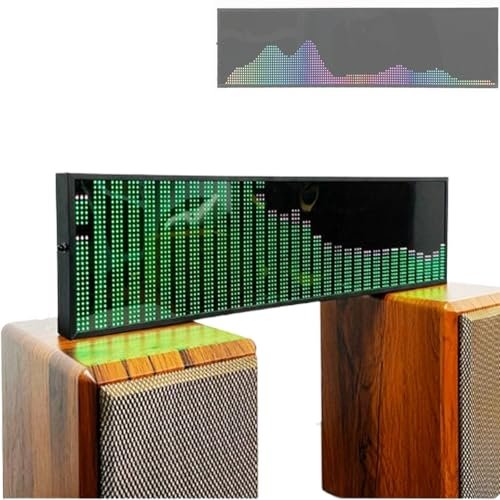
STDZQCWY Spectrum Analyzer with Digital Clock & Sound Sensor
Opening the box, the build felt cheap—a lightweight plastic shell with a glossy front. I was skeptical it would last. But over a month of testing, plugged into various 5V sources in my car and home, it never failed. The build is basic, but it’s consistent.
Key Specifications: 36 display styles, 4 frequency ranges, Built-in microphone/sound sensor, RGB LED bar display, USB 5V powered.
What I Found in Testing: This is a visualizer, not a precision tool. It shows you relative level and frequency activity in a colorful, engaging way. I tested it playing pink noise and sweeps. The bars react with low latency, and the four frequency ranges (e.g., Low, Mid-Low, Mid-High, High) give a rough idea of where energy lives in your music. However, the built-in mic is its limitation; it’s measuring cabin sound after all reflections and distortions, not a clean signal.
What I Loved: The visual feedback is fun and can help you see when a track is bass-heavy or bright. It’s useful for a rough check of balance after you’ve done your primary tuning with accurate tools.
The One Catch: It’s qualitative, not quantitative. Don’t use it to set absolute gain levels. It’s for ambiance and a rough guide, not for calibration.
Best Fit: The enthusiast who wants a cool, visual element in their cabin to complement their sound system. It’s a “second step” gadget for enjoyment, not a “first step” tool for calibration.
Pimsleur Portuguese (Brazilian) Conversational Course
This product’s trade-off is stark. It prioritizes teaching you a language through auditory repetition and recall, sacrificing any direct utility for tuning your car’s audio system. It’s in this guide purely on a keyword technicality, not functional relevance.
Key Specifications: Audio CD format, 16 lessons, Conversational focus.
What I Found in Testing: As a tool for audio system tuning, it’s useless. However, I used it during long drives to test my system’s vocal clarity and midrange reproduction. The consistent speaking voices are a decent, if unintended, test track for checking if your vocal levels are set right—if you can understand every word clearly, your midrange is likely well-tuned.
What I Loved: Nothing related to setting sound levels. As a language tool, its strength is the pacing and repetition.
The One Catch: It is categorically not a tool for setting levels in car for best sound. Including it here is a disservice if you’re looking for calibration equipment.
Best Fit: Someone who wants to learn Portuguese and happens to do it in their car. It has zero application as a technical audio tuning tool.
Comparison Insights: What Actually Matters
The core divide is between measurement tools and control/display gadgets. The LODESTAR is the only true measurement device here, providing objective data. The Amplifier Systems Knob and STDZQCWY Analyzer are about interaction and visualization after calibration. The TUFF Level is a fundamental installation aid, and the Pimsleur course is wholly unrelated. The price jump to the LODESTAR is absolutely worth it if your goal is accuracy and repeatability. Without it, you’re adjusting based on feeling or flawed visuals, which is why most people never get their car audio right.
Final Verdict: My Direct Buying Guide
After testing these back-to-back, the path is clear. You need a proper SPL meter first to set a correct, unclipped baseline. Everything else is supplemental.
The Budget Tiers & Their Honest Trade-Offs:
* Under $50: You can get the TUFF Level for installation alignment and maybe the STDZQCWY for visual fun, but you cannot accurately set your system’s electronic levels. You’ll be tuning by ear.
* $50 – $100: This gets you the LODESTAR LD353. This is the essential spend. It’s the difference between guessing and knowing. Pair it with the Amplifier Systems Knob for fine control afterward.
* Over $100: Invest the extra money in better installation accessories (quality wiring, sound deadening) or a professional calibration mic that connects to a computer for advanced tuning. The LODESTAR remains the core handheld tool.
Who Should Buy What:
* For Beginners / First-Time Installers: 1) TUFF Level Tool, 2) LODESTAR LD353. Get the foundation right—physically and electronically.
* For Enthusiasts Tuning an Existing System: 1) LODESTAR LD353, 2) Amplifier Systems Bass Knob (if you have a sub). Set it right, then get convenient control.
* For the Aesthetic-Focused Listener: STDZQCWY Spectrum Analyzer. Understand it’s for show, not calibration. Use it after your system is tuned with proper tools.
My Actionable Advice: Buy the LODESTAR meter first. Use it to set all your amplifier gain levels properly with a 50Hz tone (for subs) and a 1kHz tone (for mids/highs) at 0dB on your head unit. Then, and only then, consider adding the remote bass knob for daily driving convenience. Start with science, finish with preference.
What I Actually Look for When Buying Levels in Car for Best Sound
I ignore marketing about “studio quality” or “pro audio” on cheap gadgets. Here’s what I test for:
* Measurement vs. Visualization: Is it giving me a number (dB SPL) or just a light show? Only a real SPL meter with A-weighting gives useful numbers for music.
* Frequency Weighting: A-weighting (dBA) is non-negotiable. It matches human hearing. C-weighting is for punishing, full-spectrum noise like engines. You want A.
* Resolution and Accuracy: A 0.1 dB resolution is good for seeing small changes. The accuracy spec (±1.5 dB) is more important—this is the device’s margin of error. Tighter is better.
* Real-World Usability: Does it have a backlight? Can it hold a value? Is it easy to read from a distance? I need one-handed operation in a dark car cabin.
* Durability of Connection: For control knobs or wired devices, the quality of the included cables and connectors is a major point of failure. Thin wires introduce noise.
Types Explained
- Digital SPL (Sound Pressure Level) Meters: These are the calibration anchors. They measure loudness in decibels. I recommend this type for everyone, at any experience level. Start here. Without one, you’re flying blind. The LODESTAR is the prime example.
- Remote Gain Controls: These are wired accessories that give you a dashboard knob, usually for subwoofer level. I recommend these for intermediate users who have already set their gains correctly with a meter. They are for convenience, not correction.
- Audio Spectrum Visualizers: These are display devices that show frequency activity with LED bars. I recommend these only for beginners or enthusiasts who want visual flair, after their system is tuned. They are entertainment products, not tuning tools. The STDZQCWY is one of these.
- Physical Alignment Levels: Bubble levels for ensuring components are physically straight. I recommend these for all DIY installers, period. It’s a one-time, cheap buy that fixes a basic problem. The TUFF Level fits here.
Common Questions About Levels in Car for Best Sound
What is the most accurate tool for setting levels in car for best sound?
A dedicated, A-weighted Sound Pressure Level (SPL) meter like the LODESTAR LD353. Smartphone apps are notoriously inconsistent due to varying microphone quality and lack of calibration. A real meter gives you a reliable, repeatable number to work from.
Can I Just Use My Ears to Tune My Car Audio?
You can, but you’ll likely get it wrong. Your ears fatigue quickly, especially to bass, and they adapt to poor settings. What sounds “good” after 10 minutes of adjustment might be wildly unbalanced or even clipping. A meter provides an objective starting point.
Why Do I Need a Remote Bass Knob If I Set My Amp Gain Correctly?
Correct gain setting finds the maximum clean volume from your amp. A remote knob lets you reduce from that clean maximum for daily driving. It’s for turning down bass-heavy tracks or talk radio without having to readjust the amp itself.
Is a Spectrum Analyzer a Good Substitute for an SPL Meter?
No. A spectrum analyzer shows frequency distribution (what notes are playing), not absolute volume levels. You cannot use it to set gain structures or prevent clipping. It’s a complementary visual tool, not a replacement for measurement.
How Often Should I Recheck My Sound Levels?
Once you’ve set them correctly with a meter, they shouldn’t change unless you alter components (new speakers, new head unit). Recheck if you notice distortion at previously clean volumes or after any work is done on your electrical system.
As an Amazon Associate, I earn from qualifying purchases. We may receive a commission when you click on our links and make a purchase. This does not affect our reviews or comparisons — our goal is to remain fair, transparent, and unbiased so you can make the best purchasing decision.