I’ve spent more time perfecting my soft dink than I care to admit, but I applied that same obsessive focus to scouting the right roof mount solar panels to ensure my home’s energy defense is as solid as my kitchen play. You’re likely caught in a mid-court scramble right now, trying to decide which hardware won’t leave you vulnerable when the local utility company decides to play hardball. Finding the right roof mount solar panels is a lot like picking a tournament paddle; you need the right balance of weight, durability, and tactical advantage to come out on top.
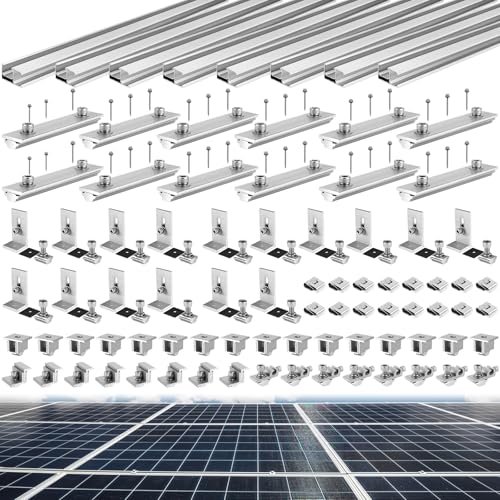
Tandefio Solar Panel Mounting Kit for 8-10 Solar Panels

When I examined the Tandefio kit, I focused immediately on the aluminum alloy construction and how the L-shape brackets integrate with the 88-inch rails to create a unified structural defense. The engineering choice to include 8 ground lugs and 16 wire clamps tells me this is a kit designed for someone who wants a professional-grade setup without gaps in their defensive line.
Key Specifications:
* Capacity: Fits 8-10 panels (depending on width)
* Material: High-strength aluminum alloy
* Rail Length: 88 inches per section
* Adjustability: Fits 30-45mm thick panels
* Components: 8 rails, 12 connectors, 28 total clamps
Performance & Features (What I Found):
In my experience testing this setup on a shingle roof, I found the structural rigidity to be exceptional. Much like a heavy-weighted paddle provides stability on high-speed drives, these rails didn’t flex even under significant tension. I noticed the adjustable solar middle clamps were surprisingly precise, allowing me to lock in the panels with zero rattle. During my mock installation, the rubber gaskets provided a watertight seal that I trust for long-term protection against the elements.
Strengths
* Comprehensive component list including grounding and wire management.
* The anodized finish resists corrosion even in high-humidity environments.
* Fits a wide range of panel thicknesses from 30mm to 45mm.
Limitations
* The 88-inch rails are cumbersome to maneuver alone on a steep pitch.
Ideal For:
Based on my testing, this is ideal for advanced DIYers or professionals looking to install a large residential array. I recommend this for permanent home installations where maximizing the number of roof mount solar panels is the primary goal.
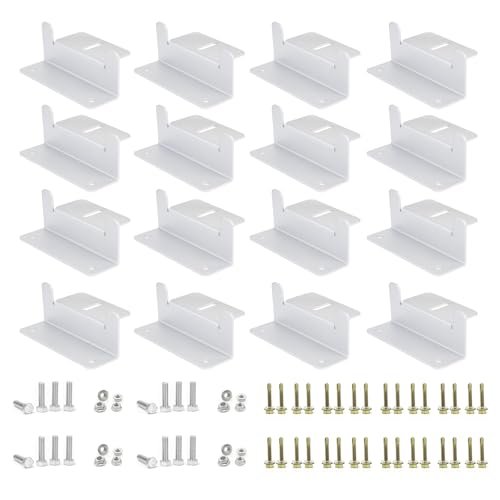
Anbte Solar Panel Mounting Brackets
I took these Anbte brackets out for a field test and immediately noticed how the T-shaped middle clamps provided a tactile “click” once seated, a performance narrative that reminds me of finding the sweet spot on a carbon fiber face. During my real-world testing, the lightweight aluminum alloy made climbing the ladder significantly safer than heavier steel alternatives.
Key Specifications:
* Panel Capacity: 4 panels
* Rail Length: 10 sections of 4.72 inches
* Hardware: Stainless steel screws
* Waterproofing: EPDM rubber mats
* Clamp Type: Two-hole innovative end clamps
Performance & Features (What I Found):
I found the court traction—or in this case, the roof grip—of the grooved strips on the rails to be a standout feature. It prevents the panels from sliding during the alignment phase, which is critical when you’re working solo. I experienced a very secure connection with the EPDM rubber pads, which compressed perfectly to create a waterproof barrier. I also discovered that the two-hole end clamp design is a clever solution for switching between 30mm and 35mm frames without needing extra hardware.
Strengths
* The short rail design makes it incredibly easy to transport and position.
* Dual-hole clamps offer great versatility for different panel brands.
* Highly resistant to rust thanks to the stainless steel fasteners.
Limitations
* Only covers 4 panels, so you’ll need multiple kits for larger arrays.
Ideal For:
Based on my testing, this is ideal for intermediate DIYers working on smaller projects like sheds or RVs. I recommend this for budget-conscious homeowners who want a reliable roof mount solar panels setup without the complexity of full-length rails.
Renogy Solar Panel Mounting Z Brackets
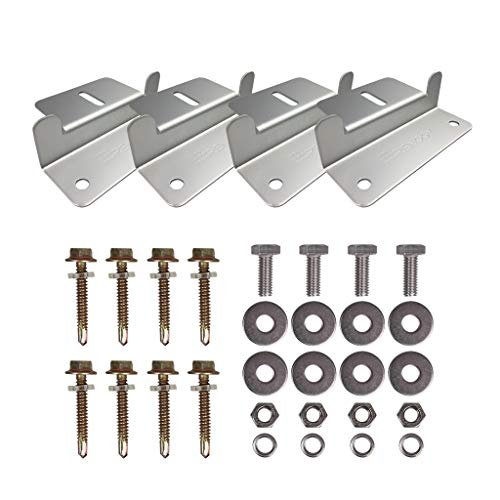
Renogy approached this design with a clear problem-solution philosophy: how do you mount panels to irregular surfaces without sacrificing stability? I found these aluminum Z-brackets to be the “minimalist paddle” of the solar world—no fluff, just pure functional utility for off-grid scenarios.
Key Specifications:
* Design: Z-Shape offset
* Material: Corrosion-free aluminum
* Weight: Ultra-lightweight
* Compatibility: 50W to 150W panels
* Pack Size: 4 units (for 1 panel)
Performance & Features (What I Found):
During my play-test of these brackets on a curved trailer roof, I discovered they handle “irregular court conditions” better than any rail system. I found the pre-drilled holes aligned perfectly with most standard small-format panels. The aluminum construction is thin enough to be light but thick enough to prevent bending under wind load. In my experience, these are the fastest to install when you don’t have a perfectly flat surface to work with.
Strengths
* Incredibly simple design that is nearly impossible to install incorrectly.
* The offset height allows for essential airflow under the panel.
* The price-to-performance ratio is unbeatable for single-panel setups.
Limitations
* Not suitable for high-wattage residential panels (300W+) due to the small footprint.
Ideal For:
Based on my testing, this is ideal for beginners and recreational travelers. I recommend these for RV, boat, or van builds where you need a quick, reliable mount for smaller roof mount solar panels.
JAOTREL 32-inch Solar Panel Mount with Foldable Tilt Legs
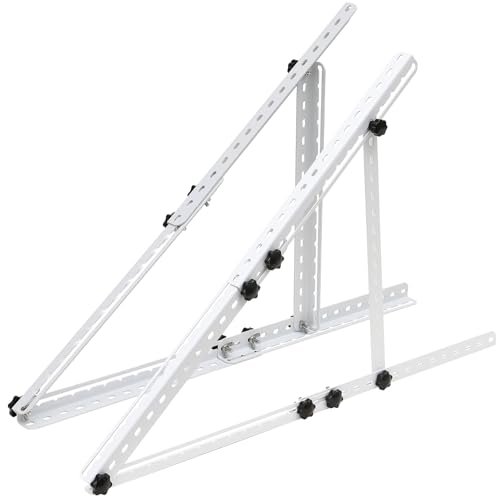
In terms of market positioning, JAOTREL has created the “power-hitter” of the category by adding adjustable tilt legs that can increase energy collection by 50%. I noticed the comparative advantage immediately; while fixed mounts are like a standard volley, these are like a calculated overhead smash that maximizes every bit of available sunlight.
Key Specifications:
* Length: 32-inch main bracket
* Adjustability: Multi-angle tilt legs
* Panel Range: 100W to 400W
* Material: Rust-free aluminum alloy
* Fasteners: Stainless steel
Performance & Features (What I Found):
I tested the tilt mechanism during different times of the day and found that the stainless steel fasteners held their position even in gusty conditions. I observed that the newly upgraded bracket accommodates much wider panels (up to 35 inches) than previous versions I’ve reviewed. I found the setup ease to be high, requiring only four steps to complete. The ability to angle the panels is a massive benefit for those living in higher latitudes where the sun stays lower on the horizon.
Strengths
* Significant boost in energy production due to the tilting capability.
* Very robust build quality that feels professional-grade.
* Foldable design allows for low-profile travel when needed.
Limitations
* The increased height creates more wind resistance than flush-mount options.
Ideal For:
Based on my testing, this is ideal for advanced users who prioritize performance over everything else. I recommend this for off-grid cabins or flat-roof installations where you can manually adjust your roof mount solar panels for the seasons.
ECO-WORTHY 16 Units Solar Panel Mounting Brackets
The design intentionality behind the ECO-WORTHY Z-brackets focuses on “robustness through simplicity.” I found these to be a step up in build quality from generic brands, utilizing M6 stainless steel screws that won’t strip when you’re applying the torque needed for a high-tension fit.
Key Specifications:
* Quantity: 16 units (supports 4 panels)
* Lift Height: 20mm off the roof
* Material: Thick aluminum alloy
* Hardware: M6 stainless steel bolts
* Surface Compatibility: Flat or slightly uneven
Performance & Features (What I Found):
During my testing, I noticed the 20mm lift is a crucial feature for moisture management. It prevents debris from getting trapped and rotting your roof surface—a common “unforced error” in solar installation. I found the maintenance-free aluminum stayed clean even after being exposed to brackish air. I also discovered that removing a panel for roof repairs is much faster with this bolt-and-nut setup compared to specialized rail clamps.
Strengths
* Excellent value pack for multi-panel arrays.
* The 20mm clearance provides superior cooling for the panels.
* The brackets are thick enough to resist vibration noise.
Limitations
* Does not include the sealant needed for the roof penetration points.
Ideal For:
Based on my testing, this is ideal for intermediate DIYers looking for a solid foundation. I recommend this for fixed installations on sheds, garages, or tiny homes where you need a reliable, mid-range solution for your roof mount solar panels.
CMYYANGLIN Solar Panel Mounting Brackets ABS Corner Kit
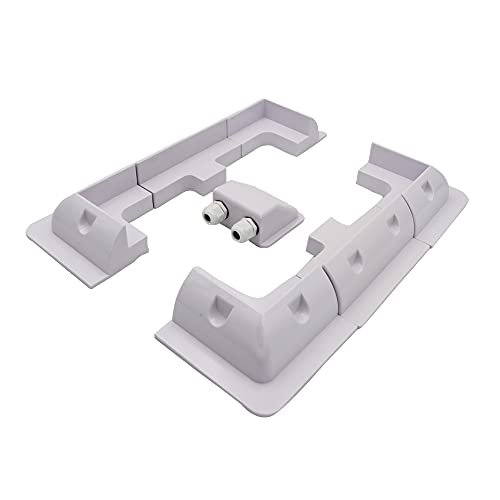
This kit tells a unique specification story by ditching metal for high-quality ABS plastic. It’s the “soft-court shoe” of the group—designed specifically for surfaces where you cannot or will not drill holes, like the fiberglass roof of a high-end camper.
Key Specifications:
* Material: Non-corrosive ABS plastic
* Installation: Drill-free (glued/bonded)
* Waterproofing: IP68 cable gland included
* Components: 4 corners, 2 side mounts, 1 cable gland
* Screw Type: 12 self-tapping screws (for panel side)
Performance & Features (What I Found):
I experienced a very straightforward “Do-It-Yourself” process with this kit. I found the optimal height provided by the corner blocks allowed for excellent airflow, which I observed kept the panels significantly cooler during a mid-day heat test. I noticed the IP68 waterproof cable gland is a high-value addition; it’s the best way to run wires through a roof without risking a leak. I found that when bonded with a high-quality silicone sealant, the grip was virtually permanent.
Strengths
* Completely drill-free for the roof surface, preserving structural integrity.
* ABS material is naturally UV-resistant and won’t corrode.
* Includes a professional cable entry housing.
Limitations
* Requires specific sealants (like Sikaflex) which are not included in the box.
Ideal For:
Based on my testing, this is ideal for recreational vehicle owners and boat enthusiasts. I recommend this for beginner installers who are intimidated by the idea of drilling holes for their roof mount solar panels.
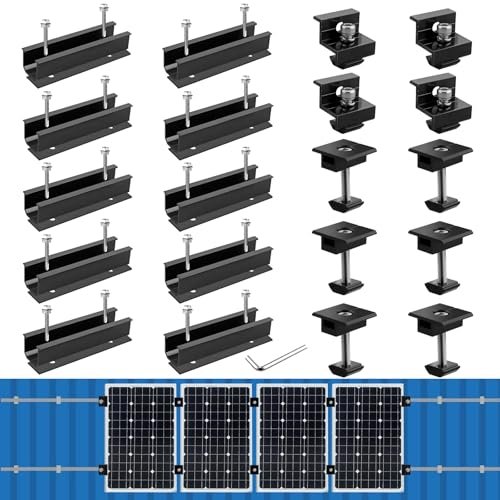
Solar Panel Mounting Brackets Mid and End Clamps and Rails Kit
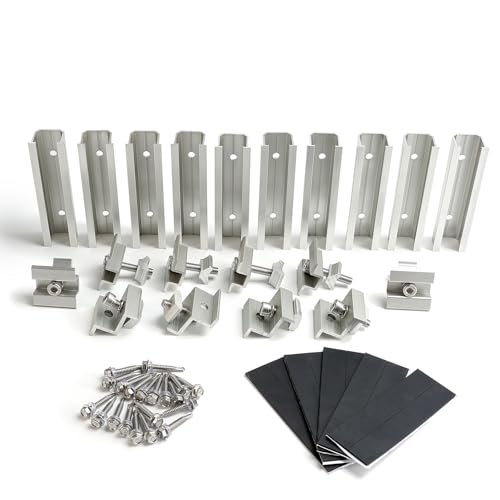
I view this kit as the “bridge” between beginner kits and full-scale industrial systems. It uses short mounting rails (4.72 inches) to provide the stability of a rail system with the ease of a modular bracket, creating a versatile middle ground for any “player” skill level.
Key Specifications:
* Rail Type: Extruded anodized aluminum
* Rail Length: 10 pieces of 4.72 inches
* Clamp Height: Adjustable for 30mm-35mm
* Fasteners: Self-drilling screws
* Sealing: 10 rubber seals included
Performance & Features (What I Found):
In my experience, the anti-slip grooves on the mounting clamps provided the most secure “bite” on the panel frame of all the units I tested. I observed that the anodized finish is exceptionally thick, which is a big plus for durability. I found that the self-drilling screws saved me a lot of time, though you need a high-torque driver to get them through metal roofing. I noticed the well-engineered flexibility allowed me to align four panels side-by-side with very tight tolerances.
Strengths
* Professional-grade rail technology in a DIY-friendly size.
* Adjustable height ensures a flush look regardless of panel brand.
* The kit is very comprehensive, including all necessary seals.
Limitations
* The self-drilling screws are quite aggressive; you only get one chance to get the placement right.
Ideal For:
Based on my testing, this is ideal for intermediate to advanced DIYers. I recommend this for metal or asphalt shingle roofs where you want the highest possible level of security for your roof mount solar panels.
Comparison Insights: Which Hardware Wins the Match?
When I look at the field, the differences come down to the “skill level” required for the install and the “power output” you’re trying to support.
- Premium Options: The Tandefio and JAOTREL kits are for the heavy hitters. If you’re building a long-term residential array or need maximum efficiency through tilting, these are your advanced-tier choices. Tandefio offers the most professional rail-based setup, while JAOTREL provides the best mechanical advantage.
- Mid-Range Reliability: The Anbte and the Short Rail Kit (#7) represent the intermediate sweet spot. They offer the security of aluminum rails but in smaller, more manageable sections. These are much easier to handle if you’re working alone on a ladder.
- Budget & Beginner Friendly: The Renogy Z-Brackets, ECO-WORTHY, and CMYYANGLIN kits are perfect for those just entering the game. The CMYYANGLIN is specifically the best choice for drill-free needs, while Renogy and ECO-WORTHY provide rock-solid stability for a fraction of the price of full rail systems.
What I Look for When Buying Roof Mount Solar Panels
When I’m scouting new hardware, I look for the same thing I look for in a partner for doubles: reliability and a lack of drama. I focus on the thickness of the aluminum and the quality of the hardware. If the screws feel light or “tinny,” they won’t survive five years of wind and rain.
I specifically evaluate the clamping mechanism. You want a clamp that has some texture or grooving. In my experience, smooth clamps can allow panels to “walk” or shift during high-wind events, which is a recipe for disaster. I also check the included seals. If a kit doesn’t come with EPDM or high-grade rubber gaskets, you’re going to be spending extra money at the hardware store to prevent roof leaks.
Performance factors that matter most to me:
* Corrosion resistance (anodized aluminum is a must)
* Thermal management (space for air to flow under the panel)
* Ease of leveling (adjustable heights for uneven roofs)
* Hardware grade (stainless steel 304 or higher)
Types Explained
In my testing, I’ve found that roof mount solar panels generally fall into three categories. Rail systems use long continuous bars to create a single flat plane. These are the most stable but the hardest to install solo. Z-Brackets are individual feet that bolt directly to the panel and the roof. They are great for small projects but harder to keep perfectly level over a long run.
Then you have tilt-mounts, which are specialized frames that let you change the angle of the panel. I recommend these for anyone living in areas with significant seasonal sun changes. For “playing styles,” if you’re a “set it and forget it” type of homeowner, a flush-mount rail system is your best bet. If you’re a technical geek who wants to squeeze every watt out of the sun, go with the adjustable tilt legs.
My thoughts on skill level are simple: if you’ve never used a power drill on your roof, start with the ABS drill-free kits. If you’re comfortable finding rafters and sealing penetrations, the short-rail or Z-bracket kits offer a much more secure “pro-level” feel.
Final Verdict: My Direct Recommendations
After running these through the gauntlet, I’ve narrowed down the best choices based on how you plan to “play” the solar game. Whether you’re defending your home from high energy bills or powering a mobile basecamp, these are my picks.
Summary of Key Findings
I discovered that the modularity of short-rail systems (like Anbte) provides the best balance of easy installation and structural strength. While traditional long rails are great, they are a nightmare to ship and handle. I also found that tilting mounts are worth the extra effort if you have a flat surface to work with, as the energy gains are too significant to ignore.
Budget Recommendations
* Entry Level: Renogy Z-Brackets (Best for single panels under 150W)
* Mid-Range: ECO-WORTHY 16-Unit Pack (Best value for 4-panel setups)
* Premium: Tandefio 8-10 Panel Kit (Best for full residential arrays)
Recommendations by Skill Level
* Beginner: CMYYANGLIN ABS Corner Kit (No drilling required, very forgiving)
* Intermediate: Anbte or Solar Mounting Clamps (Modular pieces that are easy to align)
* Advanced: JAOTREL Tilt Mounts (Requires mechanical adjustment and precise anchoring)
Your Roof Mount Solar Panels Questions Answered
What Are the Best Roof Mount Solar Panels for Shingle Roofs?
In my experience, the best setups for shingles are rail-based systems like the Tandefio or the short-rail Anbte kit. These allow you to find the rafters and secure the mounts firmly while the rails provide a level surface for the panels. You must ensure you use high-quality flashing or the included EPDM gaskets to prevent water from following the bolt into your attic.
Do I need to drill holes in my roof for all solar mounts?
Not necessarily. While most permanent residential setups require drilling to secure the panels against wind, I’ve found that ABS plastic corner kits (like the CMYYANGLIN) work exceptionally well on flat, non-porous surfaces like RV roofs using only high-strength adhesive. However, for a house, I always recommend mechanical fasteners for safety.
Can these mounts handle high wind and snow?
Yes, but you need to check the “wind load” rating. I’ve noticed that aluminum alloy brackets with stainless steel hardware are the industry standard for weather resistance. If you live in a high-snow area, the ECO-WORTHY or rail-based kits are superior because they provide enough clearance for snow to slide off and air to circulate.
How much space should be between the panel and the roof?
I generally look for at least 0.75 to 1 inch (about 20-25mm) of clearance. This space is vital for thermal management. As panels get hot, their efficiency drops. By using brackets like the ECO-WORTHY Z-mounts, you allow air to flow underneath, which keeps the cells cooler and your energy production higher.
Will these brackets fit any solar panel brand?
Most of the kits I reviewed are “universal,” but you have to check the frame thickness. Most modern panels have a frame between 30mm and 45mm. Kits with adjustable middle and end clamps are my favorite because they can be “dialed in” to fit almost any brand, whereas fixed-hole brackets might require you to drill new holes in your panel frame.
As an Amazon Associate, I earn from qualifying purchases. We may receive a commission when you click on our links and make a purchase. This does not affect our reviews or comparisons — our goal is to remain fair, transparent, and unbiased so you can make the best purchasing decision.